
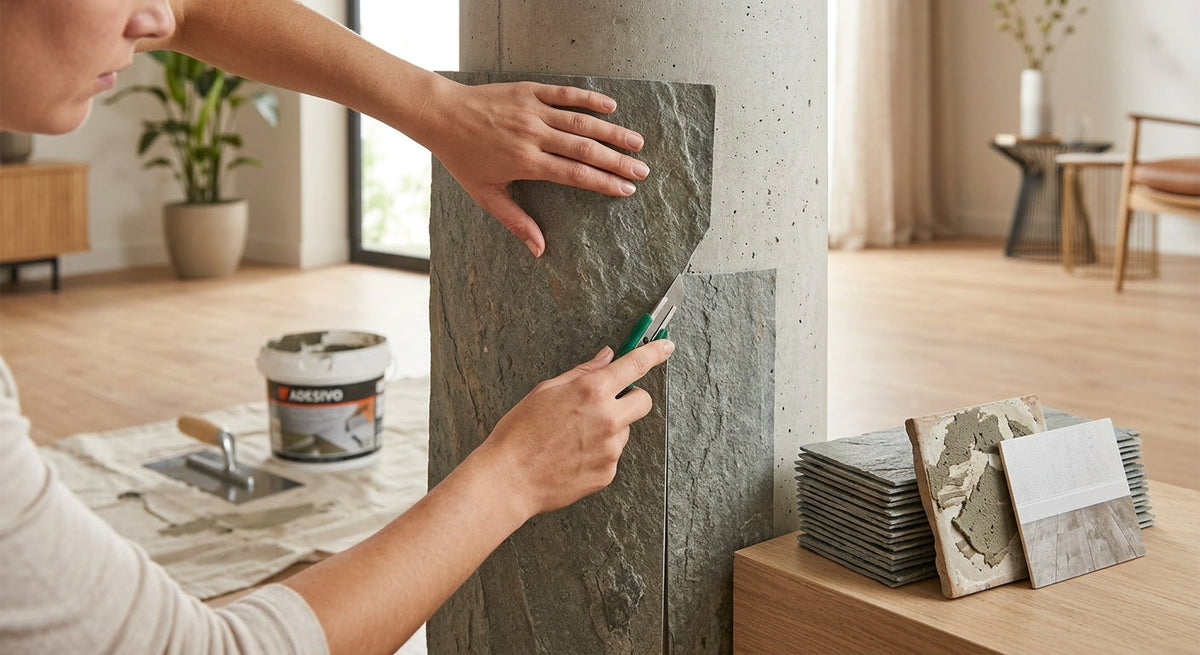
Natural flexible stone: what it is and how to choose it
Natural flexible stone resolves a contradiction that every renovation faces: we want the character of stone, but not its weight, construction work, or rubble. It is real stone in sheet form, glued to the wall like a lightweight covering.
People who come to this material have usually ruled out two other options. Natural stone tiles are appealing because of their texture, but they require a substrate capable of supporting them, cutting with an angle grinder, and a skilled installer. Imitation panels, on the other hand, can be installed in an afternoon, but the eye detects the repeated pattern as soon as they have been in the home for a few days. Flexible stone sits right in the middle: the visible face is genuine rock, and installation is more like that of a decorative panel than masonry work.
In this guide, you will learn exactly what it is, how it differs from its alternatives, where it can be installed safely, which criteria to follow when choosing a finish and format, and how to install it step by step. At the end, you will find the questions we receive most often through customer service.
What is natural flexible stone?
Natural flexible stone is a stone sheet obtained from a real block. Through a surface-separation process, the outermost layer of the rock, which concentrates the veining, color, and relief, is detached and fixed onto a flexible backing. The result retains the material's authentic surface while losing almost everything that made stone inconvenient: thickness, weight, and rigidity.
The most striking practical consequence is that the material bends. A flexible stone sheet can be rolled slightly, fitted around a column, and cut with a hand tool. There is no need for an angle grinder, water cutting, or a table saw taking up space in the living room.
The second consequence is aesthetic and carries more weight than it may seem: since each sheet comes from a different block, no two pieces are alike. This variation in veining and tone is precisely what distinguishes a real stone wall from a printed wall. It is worth bearing this in mind before buying, because anyone looking for a uniform finish repeated with millimetric precision will be disappointed by any natural material.
How to recognize genuine flexible stone. Place two panels of the same model side by side. If the pattern matches, it is not natural stone: it is a print. If the veining and shade differ even though they belong to the same range and tone, you are looking at real rock.
How it differs from other wall coverings
Before deciding, it is worth comparing the four common options side by side. Each has its strengths, and the choice depends on what you are willing to compromise on.
| Criterion | Flexible stone | Stone cladding | Imitation panel | Vinyl or paper |
|---|---|---|---|---|
| Visible material | Natural stone | Natural stone | Polyurethane or PVC | |
| Texture to the touch | Real relief | Real, deep relief | Molded relief | Smooth |
| Pattern repetition | Each piece is unique | Each piece is unique | Repeating pattern | Repeating pattern |
| Load on the substrate | Light | High | Light | None |
| Curves and columns | Adapts | No | Limited | Adapts |
| Cutting tool | Manual | Angle grinder or wet cutting | Saw or utility knife | Utility knife |
| Construction work and debris | Does not generate | Yes | Does not generate | Does not generate |
In short: if you need the depth of a masonry wall and the substrate allows it, stone cladding remains unbeatable. If budget is the top priority and the wall must remain untouched, vinyl does the job. For all other cases, especially where there are columns, lightweight partition walls, or time constraints, natural stone sheets are the most balanced option.
Where it can be installed
Natural flexible stone works indoors and in protected outdoor areas, on very different substrates: plasterboard, rendered brick, concrete, existing tile, and even furniture fronts. These are the applications our customers request most:
- Living room feature wallTV or fireplace wall, where the texture draws attention without overwhelming the room.
- BathroomsVanity walls and shower fronts, with proper sealing in areas directly exposed to water.
- KitchensFronts and peninsulas, always away from direct contact with flames and cooktop heat.
- Columns and archesTheir natural setting: the sheet follows the curve and the pattern continues without forced breaks.
- Reception areas and commercial premisesCountertops, bar fronts, and waiting areas that need character and quick installation.
- Protected exteriorPorches, overhangs, and façades protected from direct exposure to the elements.
Two limitations worth respecting. First, permanent contact with water: inside the shower, sealing is no longer optional and must be maintained over time. Second, exposure to the elements without protection: continuous exposure to rain, ice, and direct sunlight shortens the life of any bonded covering. If your project is a north-facing open façade, contact us before buying.
How to choose: five criteria
1. Use takes precedence over taste
Start with where it will go. A living room wall suits any finish; the wall behind a shower affects the sealing and joint type; an exterior column under a porch rules out the lightest shades, which show environmental dirt sooner. Define the use, and the list of candidates will narrow itself.
2. Shade, in relation to the light it will receive
A white that looks neutral in the catalog becomes cool under 6000 K LED light and warm beside a south-facing window. The practical rule: the less natural light the wall receives, the lighter the finish should be. Dark shades need space and light; in a narrow hallway, they make the space feel enclosed.
3. Texture, according to viewing distance
A wall viewed up close, such as the area behind a washbasin, benefits from fine-grained and mosaic finishes, which show their detail to advantage. A large wall viewed from a distance, such as the wall behind a living room, calls for pronounced textures that do not fade into the background at three meters.
4. Format, according to the surface
The large format reduces joints and speeds up installation, making it ideal for spacious, unobstructed walls. The smaller format offers more flexibility on surfaces with many obstacles, corners, or access panels, because each cut wastes less material.
5. Quantity, with a margin
Calculate the actual square footage and add a margin of between 5% and 10%. This is not excessive caution: cuts around corners, outlets, and junctions use up material, and buying the missing piece weeks later means risking a different batch.
Request a sample before buying enough for an entire wall. Place it in the actual room and look at it at different times of day. No catalog, however well photographed, can reproduce how natural stone behaves in the real light of your home.
Finishes in our range
Our natural flexible stone collection is organized into series named after Italian cities. They all share the same installation system, so you can combine families in a single project.
| Series | Available shades | Format |
|---|---|---|
| Rome | Beige, gray | 120 x 60 cm |
| Siena travertine | Beige, gray | 120 x 60 cm |
| Venice | White, black | 120 x 60 cm |
| Dolomites quartz | White | 120 x 60 cm |
| Milan, Naples, Turin, Bari, Arezzo | White | 120 x 60 cm |
| Trento | Light gray | 120 x 60 cm |
| Sicily | Tile red | 120 x 60 cm |
| Florence | White, gray, dark gray | 118 x 58 cm |
| Trieste mosaic | White, beige | 118 x 58 cm |
You can see all the finishes in the wall coverings collection, with a photograph of each series and details of the texture.
How it is installed, step by step
- Check the substrate. It must be firm, clean, dry and dust-free. Remove poorly adhered paint, seal the cracks and allow it to dry. On tiles, degrease thoroughly before continuing.
- Dry-lay first. Lay several pieces on the floor and arrange them to create a natural transition of tones. This step is what separates a wall that looks like stone from one that looks like a mosaic of leftover pieces.
- Mark the level line. Draw the reference line for the first row with a laser level. The first panel determines the alignment of the entire surface, and any deviation is multiplied upwards.
- Apply the adhesive. Spread a stone-compatible construction adhesive over the substrate, using a notched trowel or beads as indicated by the manufacturer. Work in sections so it does not skin over before installation.
- Place and press. Position the sheet from one end to the other, avoiding air pockets, and press with a roller or rubber block from the centre towards the edges.
- Cut and finish. Mark the reverse side and cut with a sharp utility knife or tin snips. Handle corners, ceiling junctions and the edges around sockets with pieces measured on site.
- Seal if necessary. In bathrooms, kitchens and protected outdoor areas, apply a sealant specifically designed for natural stone, following the product instructions.
Common mistakes to avoid
- Stick without dry-laying first. Opening the box and installing the pieces in the order they come out concentrates the most extreme tones in the same area.
- Buy only what you need. Without extra material for cuts, the final finish ends up being made with forced pieces.
- Choose based on a catalogue photo. The screen alters the colour. A physical sample on the actual wall prevents surprises.
- Forget to seal damp areas. It takes ten minutes and determines how the wall ages.
- Install on an unstable substrate. If the paint comes off when scraped, no adhesive can compensate for that base.
Maintenance
Maintaining a stone wall covering in sheet form is simple. For dry cleaning, a soft cloth or soft brush is enough to remove dust accumulated in the relief. For wet cleaning, use water and mild soap. With any natural stone, avoid acidic products such as limescale removers or vinegar, as they irreversibly damage the surface. Metal scouring pads should likewise be avoided for the same reason.
In bathrooms, check the seal periodically and renew it when water stops beading on the surface. This is the most reliable sign that the protector has reached the end of its service life.
Frequently asked questions
Is flexible stone real natural stone?
Yes. It is obtained by separating the surface layer from a block of natural stone and fixing it onto a flexible backing. The visible face is real rock, with its veining and relief. It is not a printed imitation of stone, which is why no two pieces are exactly alike.
Can flexible stone be installed in the bathroom?
Yes, and it is one of its most common uses. The key is sealing it with a specific stone protector and properly finishing the joints and transitions. Inside the shower, where water hits directly and continuously, maintaining the seal is no longer optional.
How do you cut natural flexible stone?
With hand tools. Mark the line on the back and cut it with a sharp utility knife or sheet-metal shears. You don’t need an angle grinder or water cutting, so installation produces much less dust and noise than solid stone.
Can it be used to cover columns and curved surfaces?
Yes, and that’s where it clearly outperforms tiles. The sheet adapts to broad curves such as columns, bar fronts, and arches, where a rigid piece would require cutting and reassembling the pattern piece by piece.
Are two panels with the same reference identical?
No, and they shouldn’t be. Since it comes from natural stone, each sheet has its own veining and tone within the same family. This variation is proof of the material’s authenticity. Unpack several pieces and arrange them before bonding them to distribute the variations.
How much flexible stone do I need for my wall?
Multiply the width by the height of the surface and divide by the number of square meters covered by each panel. Add a margin of between 5% and 10% for cuts around corners, sockets, and edges. If you have the measurements at hand, we can calculate it for you.
Questions about your project?
Write to us with the wall measurements and a photo of the space. We’ll tell you which series best suits the light you have, how many pieces you need, and which adhesive to order for your substrate. And if you’d rather see it first, request samples of the finishes you’re considering.
Share:
Decorative Acoustic Panel 120x60 Wood Effect
Paneles efecto mármol para pared: cómo elegir el acabado