Waterproof Bathroom Wall Cladding: What Options Are There and How to Choose the Right One
Bathroom Zones and Their Waterproofing Requirements
Before choosing a cladding material, it is important to understand that not all areas of a bathroom have the same water exposure. European standard EN 14411 distinguishes three zones:
Types of Waterproof Bathroom Wall Cladding
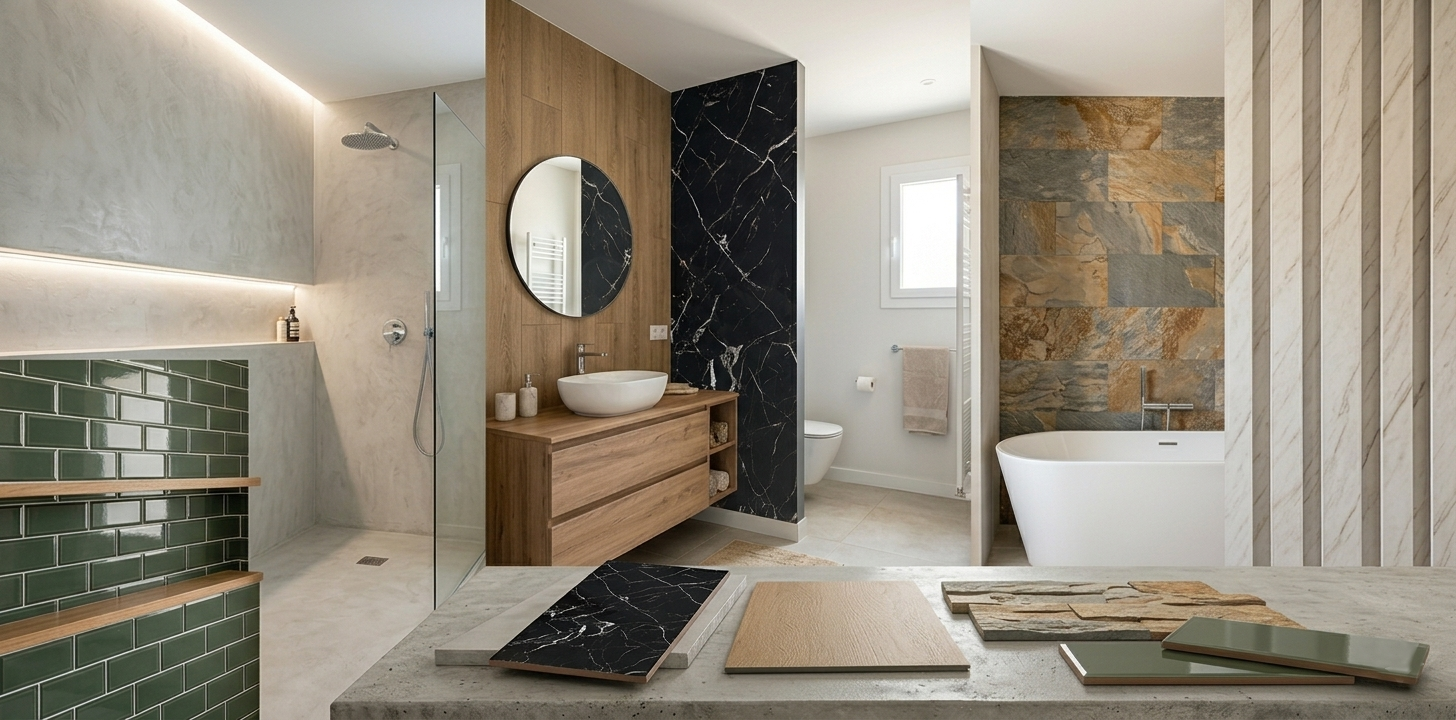
Ceramic and porcelain tile
The industry standard. Waterproof, durable, easy to clean. Actual waterproofing depends on the joint sealing: the tile itself absorbs no water, but the grout does if not treated with a water repellent.
Microcement
Joint-free coating. Very contemporary look. Epoxy or polyurethane sealing essential in showers. Professional application mandatory. Sensitive to scratches without good sealing.
Waterproof sandwich panel
PVC, HPL or composite board with waterproof core. Can be mounted directly over existing tiles without building works. Virtually jointless. Fast and clean installation.
SPC / LVT wall
100% waterproof core. Can be fitted as wall tiles or planks. Applied over existing surfaces. No building works, no dust. Seal joints in wet areas.
Flexible natural stone
Real natural stone (slate, quartzite) on fibreglass backing. Waterproof with hydrophobic sealing. No-build installation on any surface. Authentic mineral appearance.
Epoxy liquid resin
Liquid system applied in situ that forms a joint-free membrane. Very resistant to water and cleaning products. Professional application required with thorough substrate preparation.
Technical Comparison of Bathroom Cladding
| Cladding | Zone 0 (shower) | No building works | Joints | Maintenance | Approx. price/m² |
|---|---|---|---|---|---|
| Ceramic / porcelain tile | ✓ with sealed grout | ✗ | Yes — every 30–60 cm | Medium (grout) | 20–80 € |
| Microcement | ✓ with epoxy seal | ✗ | None | Low (well sealed) | 60–120 € |
| Sandwich panel PVC/HPL | ✓ | ✓ | Minimal (profile) | Very low | 25–65 € |
| SPC / LVT wall | ✓ with sealed joints | ✓ | Yes — sealable | Low | 18–55 € |
| Flexible natural stone | ✓ with water repellent | ✓ | Minimal | Low | 30–80 € |
| Epoxy liquid resin | ✓ total | ✗ | None | Very low | 80–150 € |
Detailed Analysis of Each Option
Ceramic and Porcelain Tile: The Familiar Standard
Glazed ceramic and technical porcelain tile are waterproof through the body, but the installation creates grout joints that are porous if left untreated. A bathroom with correctly laid tiles and joints sealed with epoxy grout or hydrophobic grout is fully watertight. The problem is maintenance: joints collect mould and limescale over time.
Microcement: Joint-Free but Demanding
Well-applied microcement sealed with a two-component epoxy or polyurethane resin is one of the most watertight systems available, precisely because it has no joints. Its Achilles heel is execution: it requires a perfectly prepared substrate, at least 3–4 material layers and a rigorous final sealing process.
Waterproof Sandwich Panels: The No-Build Renovation Solution
These are rigid boards with a waterproof core and a decorative surface, installed directly over existing tiles with construction adhesive and aluminium profiles. Their main advantage is no-build installation: no stripping tiles, no dust, no debris — the bathroom is ready to use again in 24–48 hours.
Renovation With vs Without Building Works: When Does Each Make Sense?
✓ With building works (ceramic, microcement)
- More durable result in the long term
- Greater choice of finishes and formats
- Allows inspection and repair of the base waterproofing
- Adds value when selling the property
- Resolves hidden structural problems
- Essential when the substrate is damaged
✓ Without building works (panels, SPC, flexible stone)
- No dust, no debris, no noise
- Bathroom usable again in 24–48 hours
- Significantly lower total cost
- Suitable for rental properties
- Reversible without structural damage
- Compatible with drywall
- No plumber or plasterer required
Step by Step: Installing Waterproof Cladding Without Building Works in a Bathroom
- Substrate check
Ensure all tiles are fully bonded. Tap each tile — a hollow sound means a loose tile. Fix or replace it before proceeding. Check for active moisture behind the cladding.
- Cleaning and degreasing
The substrate must be clean, dry and free from limescale, soap and grease. Commercial degreaser with a sponge and water rinse. Allow to dry completely (at least 24 hours without using the shower).
- Measuring and cutting
Measure each surface precisely, subtracting plumbing, sockets and fittings. Sandwich panels and SPC: circular saw, jigsaw or cutter and straightedge. Flexible stone: scissors or cutter. Always cut before bonding.
- Adhesive application
MS-polymer adhesive or manufacturer-specified adhesive, applied with a V3 notched trowel for large surfaces, or perimeter bead plus inner dots for smaller pieces.
- Positioning and pressing
Position panel from the bottom up, starting at the most visible area. Press firmly and evenly for 60 seconds. Use a spirit level on every piece. Allow 24 hours to cure before wetting the surface.
- Joint and perimeter sealing
Neutral silicone (not acetic silicone) on all perimeter joints, internal corners and at the junction with the shower tray or bath. The silicone bead must be continuous with no breaks. This is the most critical step for complete waterproofing.
- Material-specific treatment (where applicable)
For flexible stone: apply penetrating water repellent with a brush once installed and dry. For SPC wall: ensure all joints are sealed. For sandwich panels: place aluminium corner and trim profiles with silicone on the back face.
Maintaining Waterproof Bathroom Cladding
- Silicone bead: check every 2–3 years. Renew completely if cracked, discoloured or detached.
- Ceramic grout: clean with specialist grout products. Renew water repellent every 3–4 years. Replace grout showing black mould with epoxy grout.
- Sandwich panels and SPC: damp cloth with water and neutral cleaner. No acid or abrasive products. Check silicone condition on profiles every 2 years.
- Microcement: pH-neutral cleaners only. Maintenance coat of sealant every 1–2 years in intensively used showers.
- Flexible stone: damp cloth. Renew water repellent every 3–5 years depending on use intensity.
Cost of a Bathroom Renovation by Cladding Type
| Cladding | Material (m²) | Labour | Prep works | Estimated total |
|---|---|---|---|---|
| Porcelain tile + building works | 25–80 €/m² | 20–35 €/m² | Yes (300–600 €) | 600–1,400 € |
| Microcement | Included | 60–120 €/m² | Preparation | 500–900 € |
| Sandwich panel (no building works) | 25–65 €/m² | 15–25 €/m² | No | 200–550 € |
| SPC wall (no building works) | 18–55 €/m² | 10–20 €/m² | No | 140–450 € |
| Flexible stone (no building works) | 30–80 €/m² | 12–22 €/m² | No | 210–600 € |
No-build options represent a saving of 40 to 60% compared to the total cost of a full renovation with building works.
Frequently Asked Questions About Waterproof Bathroom Cladding
Which waterproof bathroom cladding is easiest to install?
Waterproof PVC or HPL sandwich panels and flexible natural stone are the easiest for DIY installation. They are cut with basic tools, bonded with construction adhesive and require no preparation work.
Can waterproof cladding be applied over existing tiles?
Yes, as long as all tiles are fully bonded, with no loose pieces and no active moisture behind them. Sandwich panels, SPC wall and flexible stone are specifically designed for installation over existing surfaces.
Is microcement genuinely waterproof in the shower?
Yes, but only when correctly applied and sealed. With a two-component epoxy or polyurethane sealer it is one of the most watertight systems available and virtually maintenance-free.
Which silicone should I use in the bathroom?
Neutral silicone with fungicide, specifically formulated for bathroom and kitchen. Avoid acetic silicone. Neutral silicone is compatible with all materials and longer-lasting in wet environments.
How long does waterproof bathroom cladding last?
Well-laid ceramic can last decades. Sandwich panels have a lifespan of 15–20 years. Well-sealed microcement 10–20 years. Flexible stone with regularly renewed water repellent over 15 years.
What should I do about mould in bathroom grout?
For surface mould: specialist mould remover and better ventilation. For deep black mould that cannot be removed: strip the grout and regrout with epoxy grout, which is permanently mould-resistant.
Which option is best for a small bathroom with no ventilation?
Materials without joints or with minimal joints: microcement, continuous sandwich panels or ceramic in large formats with epoxy grout. In windowless bathrooms, conventional grout accumulates mould far more quickly.
How much does a no-build bathroom renovation cost?
For a bathroom with 5–6 m² of wall surface, between 140 and 600 € in materials and labour depending on the panel type. That represents a 40–60% saving versus a full ceramic renovation with building works.
Conclusion
There is no single optimal waterproof cladding for every bathroom. The best choice depends on the condition of the existing substrate, the available budget, the time available and aesthetic requirements. The factor that most influences the longevity of the result is not the material chosen, but the quality of the joint and perimeter sealing.
View waterproof cladding → All wall cladding → Talk to an adviser →
Share:
Paneles murales 3D: qué son, qué materiales existen y cómo se instalan correctamente